> ## Documentation Index
> Fetch the complete documentation index at: https://private-7c7dfe99-revert-104359-revert-104251-parquet-single.mintlify.site/llms.txt
> Use this file to discover all available pages before exploring further.
> دليل خطوة بخطوة لإعداد Amazon Aurora MySQL كمصدر لـ ClickPipes
# دليل إعداد Aurora MySQL كمصدر
export const IAMAuthentication = ({engine, service, children}) => {
const services = {
aurora: {
name: 'Aurora',
resource: 'cluster',
id: 'cluster-xxxxxxxxxxxxxx'
},
rds: {
name: 'RDS',
resource: 'instance',
id: 'db-xxxxxxxxxxxxxx'
}
};
const createUserStatements = {
postgres: `CREATE USER clickpipes_iam_user;
GRANT rds_iam TO clickpipes_iam_user;`,
mysql: `CREATE USER 'clickpipes_iam_user' IDENTIFIED WITH AWSAuthenticationPlugin AS 'RDS';`
};
const svc = services[String(service).toLowerCase()];
const createUserSql = createUserStatements[String(engine).toLowerCase()];
if (!svc) throw new Error(`Unsupported IAM authentication service: ${service}`);
if (!createUserSql) throw new Error(`Unsupported IAM authentication engine: ${engine}`);
return <>
Instead of a password, you can authenticate the ClickPipes user with an AWS IAM role. This lets ClickPipes connect to your Amazon {svc.name} {svc.resource} without storing database credentials.
Enable IAM authentication
- Log in to your AWS account and go to the {svc.name} {svc.resource} you want to configure.
- Click Modify.
- Scroll to the Database authentication section.
- Select Password and IAM database authentication.
- Click Continue.
- Review the changes and select Apply immediately.
Create the ClickPipes user
Create the ClickPipes user with IAM authentication enabled, then grant it the same schema and replication privileges shown above:
{createUserSql}
{children}
Obtain the ClickHouse service IAM role ARN
- Log in to your ClickHouse Cloud account.
- Select the ClickHouse service you want to connect.
- Select the Settings tab.
- Scroll to the Network security information section at the bottom of the page.
- Copy the service's Service role ID (IAM) value, shown below.
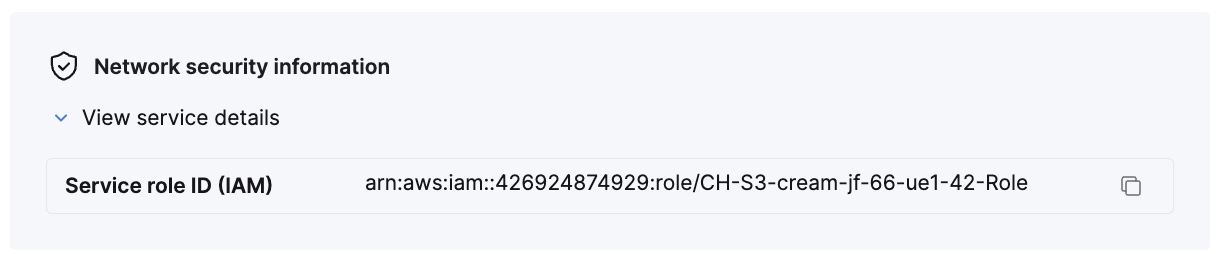
This value is your {'{ClickHouse_IAM_ARN}'} — the role ClickPipes uses to access your {svc.name} {svc.resource}.
Obtain the resource ID
- Log in to your AWS account and go to the {svc.name} {svc.resource} you want to configure.
- Select the Configuration tab.
- Note the Resource ID value — it looks like
{svc.id}. This is your {'{RDS_RESOURCE_ID}'}, which you reference in the permissions policy.
Create the IAM role
- Log in to your AWS account with an IAM user that has permission to create and manage IAM roles.
- Open the IAM console.
-
Create a new IAM role with the following trust and permissions policies.
Trust policy (replace {'{ClickHouse_IAM_ARN}'} with the IAM role ARN of your ClickHouse instance):
{`{
"Version": "2012-10-17",
"Statement": [
{
"Effect": "Allow",
"Principal": {
"AWS": "{ClickHouse_IAM_ARN}"
},
"Action": [
"sts:AssumeRole",
"sts:TagSession"
]
}
]
}`}
Permissions policy (replace {'{RDS_RESOURCE_ID}'} with the resource ID of your {svc.name} {svc.resource}, {'{RDS_REGION}'} with its region, and {'{AWS_ACCOUNT}'} with your AWS account ID):
{`{
"Version": "2012-10-17",
"Statement": [
{
"Effect": "Allow",
"Action": [
"rds-db:connect"
],
"Resource": [
"arn:aws:rds-db:{RDS_REGION}:{AWS_ACCOUNT}:dbuser:{RDS_RESOURCE_ID}/clickpipes_iam_user"
]
}
]
}`}
- Once the role is created, copy its ARN. This is your
{'{RDS_ACCESS_IAM_ROLE_ARN}'}.
You can now use this IAM role to authenticate with your {svc.name} {svc.resource} from ClickPipes.
;
};
export const Image = ({img, alt, size = "lg"}) => {
const normalizedSize = ["sm", "md", "lg"].includes(size) ? size : "lg";
return ;
};
يوضح هذا الدليل خطوة بخطوة كيفية إعداد Amazon Aurora MySQL لنسخ البيانات إلى ClickHouse Cloud باستخدام [MySQL ClickPipe](/ar/integrations/clickpipes/mysql/index). للاطلاع على الأسئلة الشائعة حول MySQL CDC، راجع [صفحة الأسئلة الشائعة لـ MySQL](/ar/integrations/clickpipes/mysql/faq).
## تمكين الاحتفاظ بالسجل الثنائي
السجل الثنائي عبارة عن مجموعة من ملفات السجل التي تحتوي على معلومات عن تعديلات البيانات التي أُجريت على مثيل خادم MySQL، وتُعد ملفات السجل الثنائي مطلوبة للنسخ المتماثل. لتهيئة الاحتفاظ بالسجل الثنائي في Aurora MySQL، يجب [تمكين التسجيل الثنائي](#enable-binlog-logging) و[زيادة فترة الاحتفاظ بالـ binlog](#binlog-retention-interval).
تُحدد ميزة النسخ الاحتياطية التلقائية ما إذا كان التسجيل الثنائي مُمكّنًا أو معطّلًا في MySQL. يمكن تهيئة النسخ الاحتياطية التلقائية لمثيلك في RDS Console بالانتقال إلى **Modify** > **Additional configuration** > **Backup** وتحديد مربع الاختيار **Enable automated backups** (إذا لم يكن محددًا بالفعل).
نوصي بتعيين **Backup retention period** إلى قيمة طويلة بشكل معقول، بحسب حالة استخدام النسخ المتماثل.
إذا حاولت ClickPipes استئناف النسخ المتماثل وكانت ملفات binlog المطلوبة قد حُذفت بسبب قيمة الاحتفاظ بالـ binlog المُعَدّة، فسينتقل ClickPipe إلى حالة خطأ وستلزم إعادة المزامنة.
بشكل افتراضي، يحذف Aurora MySQL السجل الثنائي بأسرع وقت ممكن (أي *الحذف المؤجل*). نوصي بزيادة فترة الاحتفاظ بالـ binlog إلى **72 ساعة** على الأقل لضمان توفر ملفات السجل الثنائي للنسخ المتماثل في سيناريوهات الفشل. لتعيين فترة احتفاظ للسجل الثنائي ([`binlog retention hours`](https://docs.aws.amazon.com/AmazonRDS/latest/AuroraUserGuide/mysql-stored-proc-configuring.html#mysql_rds_set_configuration-usage-notes.binlog-retention-hours))، استخدم الإجراء [`mysql.rds_set_configuration`](https://docs.aws.amazon.com/AmazonRDS/latest/AuroraUserGuide/mysql-stored-proc-configuring.html#mysql_rds_set_configuration):
[//]: # "ملاحظة: يوصي معظم موفري CDC باستخدام الحد الأقصى لفترة الاحتفاظ في Aurora RDS (7 أيام/168 ساعة). ونظرًا لأن ذلك يؤثر في استخدام القرص، فإننا نوصي، من باب التحفظ، بحد أدنى قدره 3 أيام/72 ساعة."
```text theme={null}
mysql=> call mysql.rds_set_configuration('binlog retention hours', 72);
```
إذا لم يتم تعيين هذا الإعداد، أو تم تعيينه على فترة زمنية قصيرة، فقد يؤدي ذلك إلى حدوث فجوات في سجلات MySQL الثنائية، مما يعيق قدرة ClickPipes على استئناف النسخ المتماثل.
## تكوين إعدادات binlog
يمكن العثور على مجموعة المعلمات عند النقر على مثيل MySQL الخاص بك في RDS Console، ثم الانتقال إلى علامة التبويب **Configuration**.
إذا كان لديك cluster لـ MySQL، فيمكن العثور على المعلمات أدناه في مجموعة معلمات [DB cluster](https://docs.aws.amazon.com/AmazonRDS/latest/AuroraUserGuide/USER_WorkingWithParamGroups.CreatingCluster.html) بدلًا من مجموعة معلمات DB instance.
انقر على رابط مجموعة المعلمات، وسيأخذك ذلك إلى صفحتها المخصصة. ينبغي أن ترى زر **Edit** في أعلى اليمين.
يجب ضبط المعلمات التالية كما يلي:
1. تعيين `binlog_format` إلى `ROW`.
2. تعيين `binlog_row_metadata` إلى `FULL`.
3. تعيين `binlog_row_image` إلى `FULL`.
بعد ذلك، انقر على **Save Changes** في الزاوية العلوية اليمنى. قد تحتاج إلى إعادة تشغيل المثيل الخاص بك حتى تدخل التغييرات حيز التنفيذ — ويمكنك معرفة ذلك إذا رأيت `Pending reboot` بجانب رابط مجموعة المعلمات في علامة التبويب **Configuration** الخاصة بمثيل Aurora.
## فعِّل وضع GTID (مُستحسن)
يدعم MySQL ClickPipe أيضًا النسخ المتماثل دون وضع GTID. ومع ذلك، يُوصى بتمكين وضع GTID لتحسين الأداء وتسهيل استكشاف الأخطاء وإصلاحها.
تُعد [Global Transaction Identifiers (GTIDs)](https://dev.mysql.com/doc/refman/8.0/en/replication-gtids.html) معرّفات فريدة تُسنَد إلى كل معاملة تم تثبيتها في MySQL. وهي تُبسّط النسخ المتماثل لـ binlog وتجعل استكشاف الأخطاء وإصلاحها أكثر سهولة. **نوصي** بتمكين وضع GTID، بحيث يتمكن MySQL ClickPipe من استخدام النسخ المتماثل المستند إلى GTID.
النسخ المتماثل المستند إلى GTID مدعوم في Amazon Aurora MySQL v2 (MySQL 5.7) وv3 (MySQL 8.0)، وكذلك Aurora Serverless v2. لتمكين وضع GTID لمثيل Aurora MySQL الخاص بك، اتبع الخطوات التالية:
1. في RDS Console، انقر على مثيل MySQL الخاص بك.
2. انقر على علامة التبويب **Configuration**.
3. انقر على رابط مجموعة المعلمات.
4. انقر على زر **Edit** في الزاوية العلوية اليمنى.
5. اضبط `enforce_gtid_consistency` على `ON`.
6. اضبط `gtid-mode` على `ON`.
7. انقر على **Save Changes** في الزاوية العلوية اليمنى.
8. أعد تشغيل المثيل لتصبح التغييرات سارية المفعول.
## تهيئة مستخدم قاعدة بيانات
اتصل بمثيل Aurora MySQL الخاص بك باستخدام مستخدم مسؤول، ثم نفّذ الأوامر التالية:
1. أنشئ مستخدمًا مخصصًا لـ ClickPipes:
```sql theme={null}
CREATE USER 'clickpipes_user'@'%' IDENTIFIED BY 'some-password';
```
2. امنح أذونات المخطط. يوضّح المثال التالي أذونات قاعدة البيانات `mysql`. كرر هذه الأوامر لكل قاعدة بيانات ولكل مضيف تريد النسخ المتماثل منه:
```sql theme={null}
GRANT SELECT ON `mysql`.* TO 'clickpipes_user'@'host';
```
3. امنح المستخدم أذونات النسخ المتماثل:
```sql theme={null}
GRANT REPLICATION CLIENT ON *.* TO 'clickpipes_user'@'%';
GRANT REPLICATION SLAVE ON *.* TO 'clickpipes_user'@'%';
```
### استخدام مصادقة IAM (اختياري)
## إعداد الوصول إلى الشبكة
### التحكم في الوصول المستند إلى عنوان IP
لتقييد حركة المرور الواردة إلى مثيل Aurora MySQL لديك، أضِف [عناوين IP الثابتة لـ NAT المذكورة في الوثائق](/ar/integrations/clickpipes/networking/static-ips) إلى **قواعد الدخول** في مجموعة الأمان الخاصة بـ Aurora.
### الوصول الخاص عبر AWS PrivateLink
للاتصال بمثيل Aurora MySQL الخاص بك عبر شبكة خاصة، يمكنك استخدام AWS PrivateLink. اتبع [دليل إعداد AWS PrivateLink لـ ClickPipes](/ar/resources/support-center/knowledge-base/cloud-services/aws-privatelink-setup-for-clickpipes) لإعداد الاتصال.
## ما الخطوة التالية؟
الآن بعد تهيئة مثيل Amazon Aurora MySQL لديك لإجراء النسخ المتماثل عبر `binlog` والاتصال الآمن بـ ClickHouse Cloud، يمكنك [إنشاء أول MySQL ClickPipe لديك](/ar/integrations/clickpipes/mysql/index#create-your-clickpipe). وللاطلاع على الأسئلة الشائعة حول MySQL CDC، راجع [صفحة الأسئلة الشائعة الخاصة بـ MySQL](/ar/integrations/clickpipes/mysql/faq).